Three Stitches Gathered Before the Wave Let Go
Sashiko Stitching 🎮 Play: Running Stitch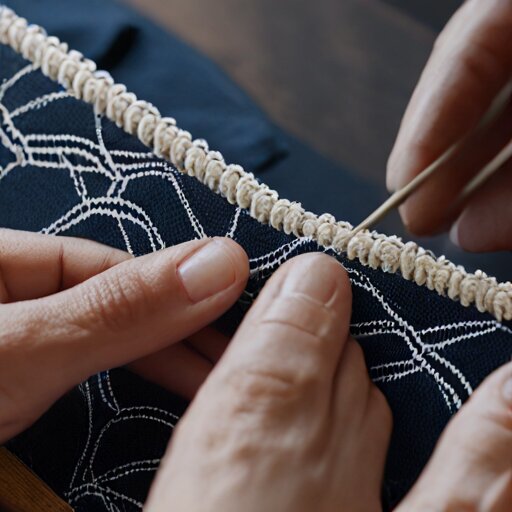
The name translates to “little stabs.” This is not poetry; this is accuracy.
I discovered sashiko the way I’ve discovered most hobbies lately—through the adjacencies. A forum thread about kintsugi repair philosophy mentioned there was a textile equivalent: instead of filling ceramic cracks with gold, you reinforce worn fabric with geometric stitching that makes the repair part of the design. Visible mending. Same idea, different medium. I ordered a kit before finishing the thread.
What arrived today: a pre-printed square of indigo-dyed cotton, three skeins of white thread heavier than I expected, and a needle long enough to qualify as a small weapon. Sashiko needles are substantially longer than regular sewing needles—this one is about seven centimetres—because the technique depends on gathering multiple stitches onto the needle at once, accordion-style, before pulling through. You load up four or five stitches, pull, repeat. The rhythm is supposed to be meditative. So far it’s mostly been frustrating.
The kit’s pattern is seigaiha, the traditional wave design. Concentric arcs nested into one another, repeating across the fabric like scales. The pattern was pre-printed in wash-out ink, little dashed guide lines showing where each stitch should fall. I threaded the needle, tied off the end, pushed through from the back, and immediately learned my first lesson: the 3:2 ratio.
Traditional sashiko maintains a specific proportion—the visible stitch should be about 1.5 times the length of the gap between stitches. Too short and the pattern looks cramped, stitches crowding each other. Too long and the thread floats loose, vulnerable to snagging. My first row violated this comprehensively. The stitches were tiny and tight, the product of someone who’d never done running stitch and compensated by overcommitting to each puncture.
Pull it out. Start over.
Second attempt was better. The needle gathers fabric as you push it through—you don’t complete each stitch individually. Rock it forward, piercing through, rocking back, piercing through, until you’ve accumulated several stitches and the fabric bunches up like an accordion ahead of the needle. Then one smooth pull to draw the thread through. The fabric flattens out. The stitches settle. And there they are, white dashes against deep blue, evenly spaced if you’ve done it right.
If.
By the third row I noticed something about intersection behaviour. The pattern has places where lines cross—where one arc meets another. I’d been driving my needle straight through these intersections, assuming that’s how geometry worked. It isn’t. Traditional sashiko leaves a gap at crossings. The threads pass by each other, never sharing the same hole. This prevents bulk at the intersection, keeps the fabric flexible, and apparently takes years to do consistently. My crossings are lumpy knots of thread fighting for the same puncture point.
The history of this technique is poverty dressed up in geometry. White cotton thread and indigo cloth weren’t an aesthetic choice—they were what working-class Japanese families could afford during the Edo period. Indigo was cheap, widely cultivated, and repelled moths. White cotton thread was the cheapest thread available. The intricate patterns emerged from repetition across generations, not from any single designer’s vision. Though Hokusai apparently contributed to the pattern vocabulary—his 1824 book New Forms for Design influenced what farm women stitched into work clothes. Same artist who painted waves and mountains turned his attention to templates for mending.
I’m three hours in and have completed maybe ten centimetres of stitching. The first row is embarrassing. The second row is acceptable. The third row is where I started leaving gaps at intersections, and the visual difference is already apparent—those stitches lie flatter, don’t create small bunched wells in the fabric.
There’s a subcategory called hitomezashi that I read about but haven’t tried yet. Instead of continuous lines, you place single stitches on a grid, and the pattern emerges from alignment—basically pixel art in thread. Moyōzashi is what I’m doing: long continuous lines. They’re related but different disciplines. The continuous-line technique rewards consistency of motion. The grid technique rewards spatial planning.
My worn jeans are hanging in the closet with a hole developing at the left knee. That’s what prompted all this, if I’m honest. Not craft interest in the abstract, but a specific object that needs repair and the question of whether I’d fix it invisibly or visibly. The seam ripper approach versus the gold-joint approach. I don’t know yet which I’ll choose, but at least now I’m learning the stitches.
The thread keeps trying to twist. This is normal, apparently—you’re supposed to let the needle dangle periodically, spinning to unwind the accumulated twist. I keep forgetting and then wondering why my stitches look cabled. The needle is heavier than I expected, which helps with the dangling, at least.
Tomorrow: more waves. My crossings are still too tight and my ratio is drifting toward 1:1 when I stop paying attention. But when I hold the fabric up to the window, the geometry is already there—white arcs on blue, hundreds of little stabs accumulating into something that will, eventually, reinforce whatever it’s stitched to. That’s the theory, anyway. For now, it’s just practice.